# Reading and Writing Data
In this step, we will create and extend your first app to read and write data from the IoThub.
# Create a Thing and Add Properties in the IoTHub
To read or write data, you first need to add a Thing and a Property in the IoTHub. This is only a step by step guide. For detailed informations on Things, Properties and their management, please refer to the IoTHub user manual (opens new window).
# Thing Creation
- Use the option Open IoTHub in the menu on the top right of the AppDesigner
- In the IoTHub frontend, navigate to the Things page ()
- Then, click the icon in the sidebar to add a new Thing
- In the dialog that opens up, select Virtual Thing as the Thing type and click Next
- In the next step, enter a title such as My First Thing and a name and click Next
- Check the name and type of the Thing and click Install

# Property Creation
- Select the Thing you just created in the sidebar on the left
- Click on the icon on the top right to add a new Property
- In the dialog that opens up, enter room_temp as the name and select float64 as the type
- Click Confirm to add the Property to the Thing
That's it! You just created your first Thing with your first Property in the IoTHub.
# Read and Write the Property With an App
Now that you created your first Property, it is time to read and write it using an app. Therefore, open the AppDesigner again by clicking on the AppDesigner entry in the IoTHub's navigation bar. In the welcome screen of the AppDesigner, load the app you created in Build Your First App.
# Visualize the Property
Let us first visualize the current temperature using an Output Widget, in our case the Property Value Text. First, select the Page in the widget tree and click on the add widget button () next to it. Then, select Property Value Text () to add the widget.
In the widget editor of the Property Value Text:
- Set the font size () to Very Large
- Set the text alignment to Center ()
- Make the font Bold ()
- For the Width () enable the Full Width switch
- Set the Placeholder Text () to -- °C (this is the text that is displayed when there is no value available)
- Select the Thing you created before in the Thing selection ()
- Select the Property you created before (room_temp) in the Property selection ()
- Set the Unit () of the Property to °C
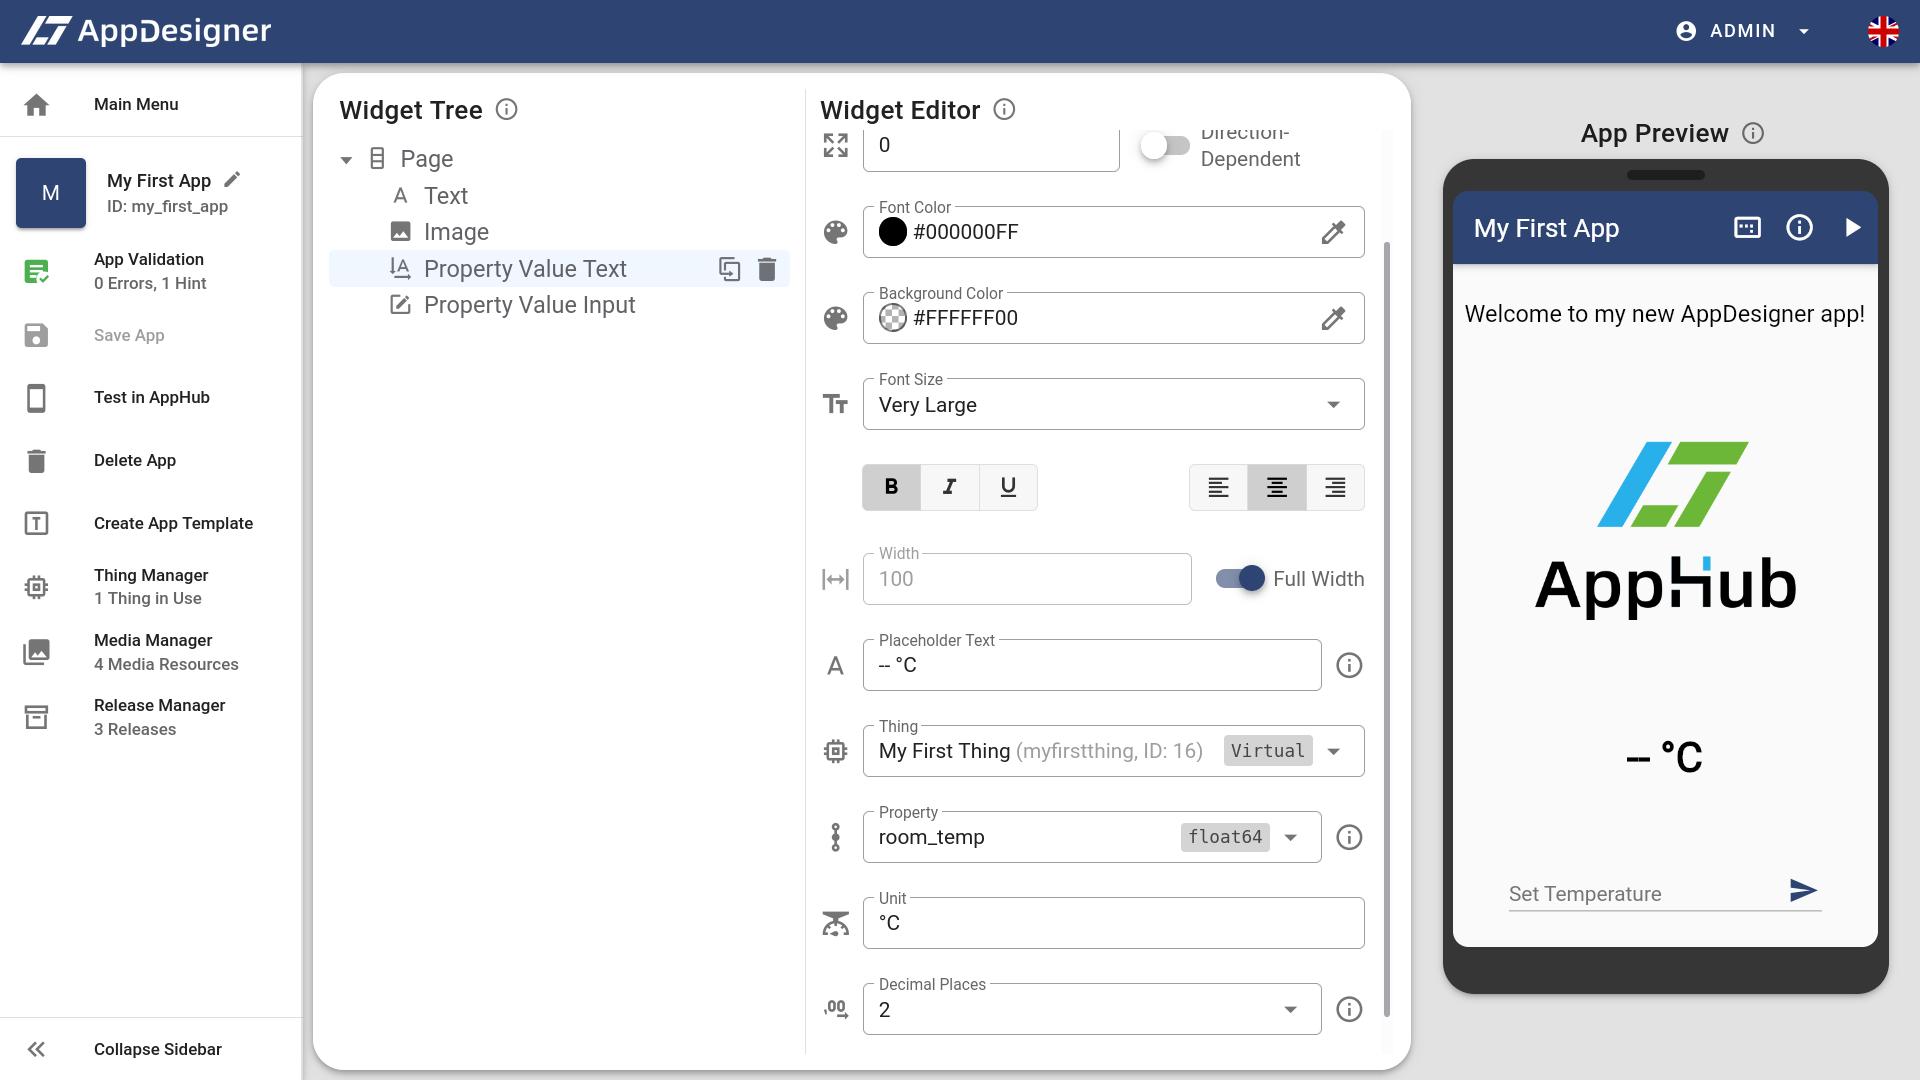
That's it! When adding this widget to your AppHub, it always displays the current room temperature.
# Write a Value to the Property
In addition to visualizing a Property, it is also possible to write a value to it using a Property Value Input widget. Therefore, select the Page in the Widget Tree and click on the add widget button (). Then, select Property Value Input () to add the widget.
In the widget editor of the Property Value Input:
- Set the Width () to 240
- Enter Set Temperature as the Hint ()
- Select the Thing you created before in the Thing selection ()
- Select the Property you created before (room_temp) in the Property selection ()
# Update Your App in the AppHub
Now that you added the new widgets to your app, it is time to save the app using the save icon in the sidebar (or just press Ctrl+S). Then, open the AppHub on your smartphone, and go to the overview screen. Here, open the app options of your app ( on the card) and click Refresh.
# Using the App
After the successful update, you can open your app and it should display the new UI. Initially, no value is displayed and the UI says -- °C. To change this, enter a value in the input field at the bottom and click the send button () next to it. The new value is now written to the IoTHub (you can visit the IoTHub Things page again and check it) and therefore also displayed in your app instead of -- °C.
Congratulations! This was the last section of our getting started guide. You built your first app, installed the AppHub on your smartphone, extended the app to write actual data and updated it! The next page of this intro will provide you with some links to other interesting parts of this documentation.